
Set up Market Selector
September 11, 2024Translations
September 11, 2024
Connect stores
For brands aiming to succeed in international markets, managing multiple expansion stores and accepting a range of currencies is a strategic move. Geos simplifies this process by seamlessly linking your expansion stores and Shopify Markets.
Some features mentioned in this article are available from Growth plan. See pricing plans.
Why is connecting stores required?#
Connecting store is a must step to ensure Geos to function properly.
When your store is connected, Geos syncs location data to display the appropriate countries and languages on your storefront.
Important: If you have only one store, it must be connected as the primary store.
How to connect multiple stores?#
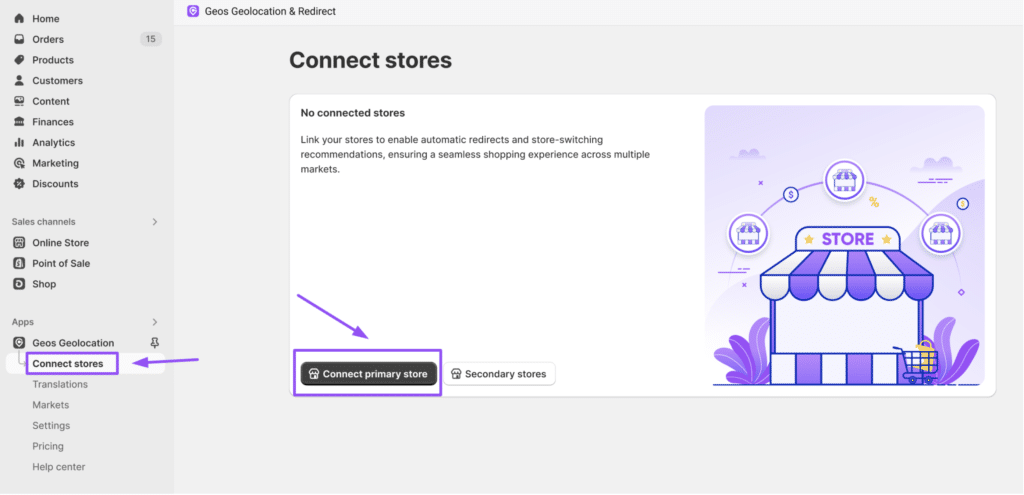
1. Add your Primary Store
- Open Geos from your Primary Store
- Go to Connect stores tab on your navigation bar
- Click Connect primary store
2. Add your Secondary Stores
To add secondary stores, you need to first copy the code generated from Geos in your Primary store
- Open Connect stores tab of your primary store
- In Connect secondary stores section, copy the code generated
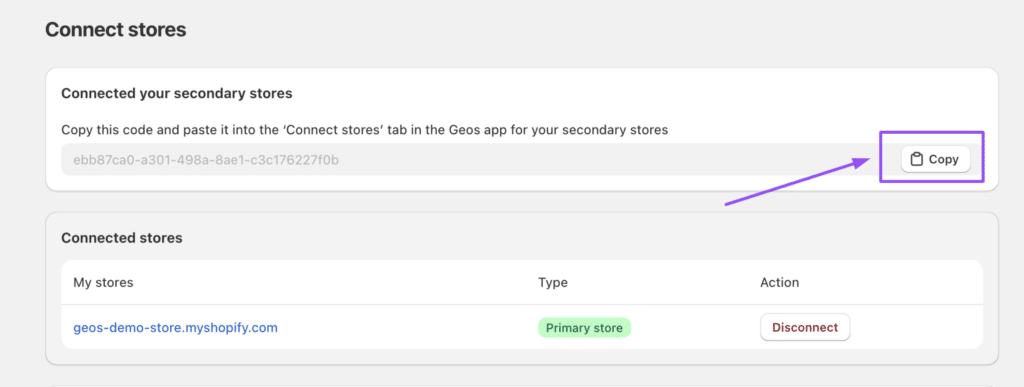
After copy the code, open Geos in your expansion store to connect
- Go to Connect stores tab on your navigation bar
- Click Connect secondary store
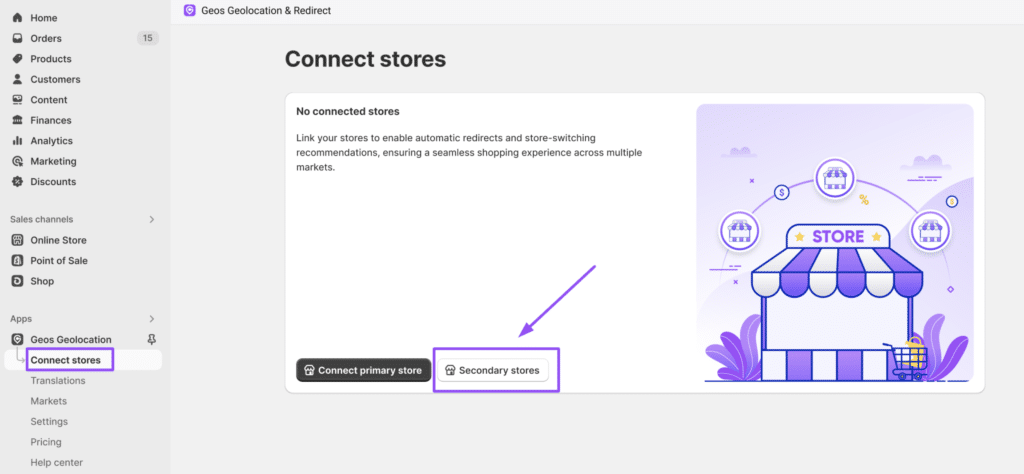
- Paste the code you copied from Primary store
- Click Connect
Repeat above steps for all of your secondary stores you want to connect.
3. Resolve the duplication issues
In some cases, two or more of your stores may be configured to sell in the same region, which can cause the Geos feature to function incorrectly. When this happens, the system will detect the duplications and allow you to choose which store should handle customer redirects from those countries.
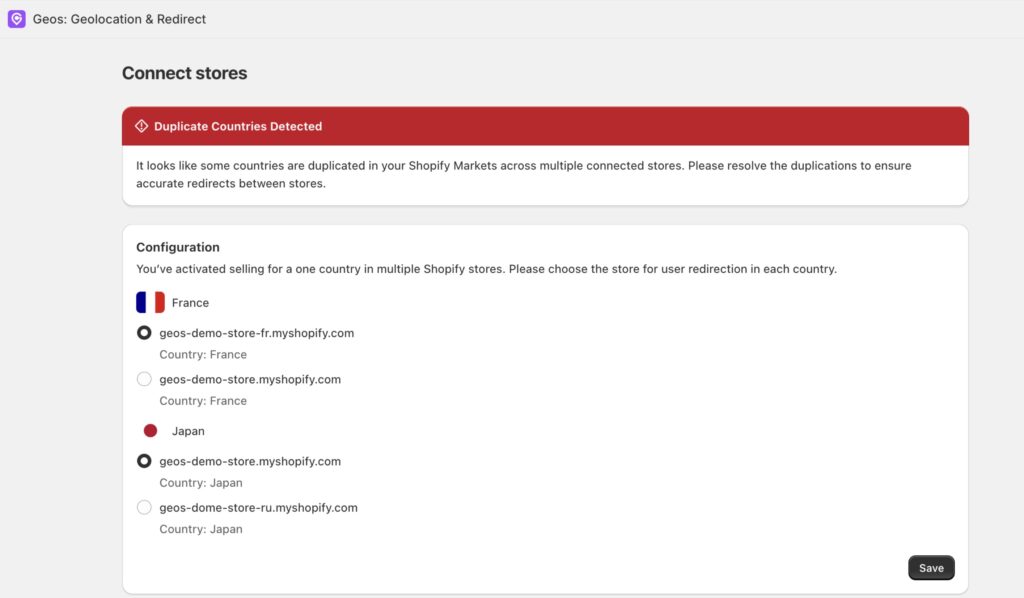
For instance, if you have connected two stores and both of them have delivery options for Canada, you’ll need to choose the store you use to sell to users from Canada.
Option 1 (recommended): Adjust Shopify Markets settings in each store
For example, if your geos-demo-store-fr.myshopify.com handles orders for France, consider removing France from the Markets settings of geos-demo-store.myshopify.com.
Note: After updating your Markets in Shopify admin, remember to sync your data by going to Markets tab in Geos > Scroll down to Sync Geos with Shopify Markets > Sync data
Option 2: Address the duplications directly in Geos Geos will detect and list all duplications. To resolve them in the app, simply select the preferred store for each country and click Save.
4. Enable the popup in all your stores
Once you’ve connected and synced your markets, make sure to activate the geolocation popup across all your stores. Learn more about customize geolocation popup.
Exclude URLs#
What is Exclude URLs feature used for?#
This feature allows you to exclude specific URLs from triggering the geolocation popup. This is particularly useful for sensitive pages such as check out page or shared contents, such as blogs, that should be accessible to all users, regardless of their location.
By adding a list of URLs to exclude, you can ensure that users can access these sections without being redirected based on their IP address, ensuring a seamless experience for your customers.
How to Exclude URLs?#
To exclude an URL from Geos, open Connect stores tab from your navigation bar

In Exclude URLs section, enter the URL part after your domain only.
For example, to exclude all blog-related URLs, if your store URL for blogs is https://geos-demo-store.myshopify.com/blog, you should only enter ‘/blog’.
Click Add
Repeat above steps for all URLs you want to exclude from the geolocation.
Tips: If you only want to exclude a single page, add the complete URL of that page.
Note: Exclude URLs section will only be displayed after you connect your store. URLs need to be configured in each store individually.
By customizing your URL exclusions, you can optimize Geos’ geolocation features to deliver a better user experience.